Amazon Elastic Compute Cloud (EC2)
Overview
SMARTUNIFIER (SU) supports deployment using an Amazon EC2 Instance on the AWS Cloud. This guide steps you through the process of creating the needed AWS resources and the deployment of SMARTUNIFIER Manager on an Amazon EC2 Instance.
Cost and Licenses
SMARTUNIFIER charges you per running SU Instance. There are no charges for running the SMARTUNIFIER Manager. If you don’t have a licence yet, contact info@amorphsys.com.
You are responsible for the cost of AWS services used in the reference deployment of this guide. For cost estimates, see the pricing pages for each AWS service this guide is using. Some cost can be minimized e.g., by opting for a smaller Amazon EC2 Instance type.
Architecture
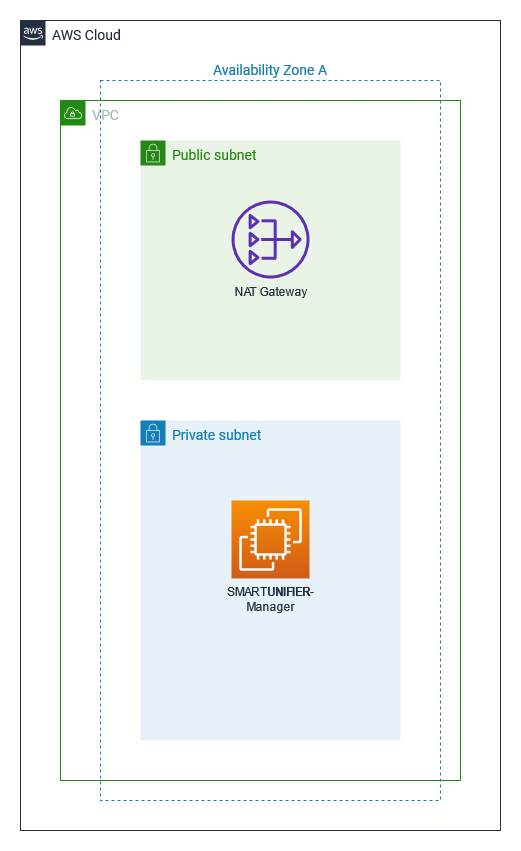
This guide will set up the following SMARTUNIFIER environment on AWS:
A virtual private cloud (VPC) configured with one Availability Zones (AZ), with public and private subnet.
Appropriate security groups for each instance of function to restrict access to only necessary protocols and ports.
SMARTUNIFIER Manager running on an EC2 Instance is located in the private subnet.

You can also deploy SMARTUNIFIER into your existing VPC.
Prerequisites
AWS account
If you don’t already have an AWS account, create one at https://aws.amazon.com by following the on-screen instructions. Your AWS account is automatically signed up for all AWS services. You are charged only for the used services.
Specialized Knowledge
Before deploying and operating the SMARTUNIFIER Manager on Amazon EC2, it is recommended that you become familiar with the following AWS services (If you are new to AWS, see Getting Started with AWS):
Planning the Deployment
Before you deploy SMARTUNIFIER on AWS, please review the following sections for guidelines on instance types, storage and high availability / disaster recovery.
Deployment Options
There are two options available for the deployment:
Deploy SMARTUNIFIER into a new VPC (end-to-end deployment). This option builds a new AWS environment consisting of the VPC, subnets, security groups and other infrastructure components.
Deploy SMARTUNIFIER into an existing VPC. This option provisions SMARTUNIFIER in your existing AWS infrastructure.
Storage
We recommend using an EBS volume since it is persistent, even in the case of instance termination or crash. Using EBS volumes help to ensure high availability and durability for the instance.
Volume Type: General Purpose SSD (gp2).
Size (GiB): 8.
Instance Selection
Which instance type to use depends on how much workload will be delivered to the instance. For information on instance types, see the AWS Website. The workload is dependent on the complexity of the integration scenario within SMARTUNIFIER . It also can be measured based on the total amount of managed SU Instances.
Instance type |
SU Workload (Number of SU Instances) |
|---|---|
t2.micro |
<= 5 |
t2.small |
<= 20 |
t2.medium |
<= 100 |
t2.large |
> 100 |
Deployment Steps
Single-AZ Deployment creating new VPC - expected deployment time: 10-20 min
Step 1. Prepare Your AWS Account
If you don’t already have an AWS account, create one at https://aws.amazon.com/ by following the on-screen instructions.
Select the AWS Region in the navigation bar where you want to deploy SMARTUNIFIER on AWS.
Create a key pair in your preferred region.
If necessary, request a quota limit increase for the EC2 instance type that you’ve decided to deploy SMARTUNIFIER on. You might need to do this if you already have an existing deployment that uses this instance type, and you think you might exceed the default quota.
Step 2. Create Cloud Formation Stack
The Infrastructure for the deployment in a new VPC is provided in the CloudFormation template below.
Create a new AWS CloudFormation stack.
Select Upload a template file and upload the yml-file below then click next.
On the Specify Page enter a Stack name and configure the following parameters within the template:
Parameter label |
Default value |
Description |
|---|---|---|
VpcCIDR |
10.192.0.0/16 |
CIDR block for the VPC |
PublicSubnet1CIDR |
10.192.10.0/24 |
CIDR block for the public subnet located in Availability Zone 1. |
PublicSubnet2CIDR |
10.192.11.0/24 |
CIDR block for the public subnet located in Availability Zone 2. |
PrivateSubnet1CIDR. |
10.192.20.0/24 |
CIDR block for the private subnet located in Availability Zone 1. |
PrivateSubnet2CIDR. |
10.192.21.0/24 |
CIDR block for the private subnet located in Availability Zone 2. |
Leave the default configuration on the Options page and select Next.
On the Review page, review and confirm the template settings.
Choose Create stack to deploy the stack.
When the status is CREATE_COMPLETE, the AWS infrastructure for SMARTUNIFIER is ready.
Step 3. Deploy SMARTUNIFIER Manager
Deploy SMARTUNIFIER through the AWS Manangement Console.
Open a web browser
Go to the following URL: https://console.aws.amazon.com
In the AWS Manangement Console, select Services -> EC2
Click Launch Instance and follow the configuration below:
Step 1: Enter a name for the instance
Step 2: Search for the SMARTUNIFIER AMI you want to launch
Step 3: Select the Instance Type
Step 4: Select the key-pair from Step 1. Prepare Your AWS Account to access the instance
Step 5: Select the appropriate VPC and subnet
If you used the provided SMARTUNIFIER Cloud Formation Template, select the VPC and Subnet created by the stack
Step 6: Verify that the storage settings are correct for the SMARTUNIFIER instance. For all supported instance types the following storage settings are correct:
For the Root volume, 10 GB of General Purpose SSD
Step 7: Review the instance settings
Connect to the instance by using the key pair created in Step 1. Prepare Your AWS Account
Start the SMARTUNIFIER Manager
./SMARTUNIFIER/UnifierManager.sh
You can access SMARTUNIFIER Manager on
https://private_or_public_IP_address:9000
Description:  This template deploys a VPC, with a pair of public and private subnets spread
across two Availability Zones. It deploys an internet gateway, with a default
route on the public subnets. It deploys a pair of NAT gateways (one in each AZ),
and default routes for them in the private subnets.

Parameters:
 EnvironmentName:
  Description: An environment name that is prefixed to resource names
  Type: String

VpcCIDR:
  Description: Please enter the IP range (CIDR notation) for this VPC
  Type: String
  Default: 10.192.0.0/16

PublicSubnet1CIDR:
  Description: Please enter the IP range (CIDR notation) for the public subnet in the first Availability Zone
  Type: String
  Default: 10.192.10.0/24

PrivateSubnet1CIDR:
  Description: Please enter the IP range (CIDR notation) for the private subnet in the first Availability Zone
  Type: String
  Default: 10.192.20.0/24

Resources:
VPC:
  Type: AWS::EC2::VPC
  Properties:
    CidrBlock: !Ref VpcCIDR
    EnableDnsSupport: true
    EnableDnsHostnames: true
    Tags:
      - Key: Name
        Value: !Ref EnvironmentName

InternetGateway:
  Type: AWS::EC2::InternetGateway
  Properties:
    Tags:
      - Key: Name
        Value: !Ref EnvironmentName

InternetGatewayAttachment:
  Type: AWS::EC2::VPCGatewayAttachment
  Properties:
    InternetGatewayId: !Ref InternetGateway
    VpcId: !Ref VPC

PublicSubnet1:
  Type: AWS::EC2::Subnet
  Properties:
    VpcId: !Ref VPC
    AvailabilityZone: !Select [ 0, !GetAZs '' ]
    CidrBlock: !Ref PublicSubnet1CIDR
    MapPublicIpOnLaunch: true
    Tags:
      - Key: Name
        Value: !Sub ${EnvironmentName} Public Subnet (AZ1)

PrivateSubnet1:
  Type: AWS::EC2::Subnet
  Properties:
    VpcId: !Ref VPC
    AvailabilityZone: !Select [ 0, !GetAZs  '' ]
    CidrBlock: !Ref PrivateSubnet1CIDR
    MapPublicIpOnLaunch: false
    Tags:
      - Key: Name
        Value: !Sub ${EnvironmentName} Private Subnet (AZ1)

NatGateway1EIP:
  Type: AWS::EC2::EIP
  DependsOn: InternetGatewayAttachment
  Properties:
    Domain: vpc

NatGateway1:
  Type: AWS::EC2::NatGateway
  Properties:
    AllocationId: !GetAtt NatGateway1EIP.AllocationId
    SubnetId: !Ref PublicSubnet1

PublicRouteTable:
  Type: AWS::EC2::RouteTable
  Properties:
    VpcId: !Ref VPC
    Tags:
      - Key: Name
        Value: !Sub ${EnvironmentName} Public Routes

DefaultPublicRoute:
  Type: AWS::EC2::Route
  DependsOn: InternetGatewayAttachment
  Properties:
    RouteTableId: !Ref PublicRouteTable
    DestinationCidrBlock: 0.0.0.0/0
    GatewayId: !Ref InternetGateway

PublicSubnet1RouteTableAssociation:
  Type: AWS::EC2::SubnetRouteTableAssociation
  Properties:
    RouteTableId: !Ref PublicRouteTable
    SubnetId: !Ref PublicSubnet1


PrivateRouteTable1:
  Type: AWS::EC2::RouteTable
  Properties:
    VpcId: !Ref VPC
    Tags:
      - Key: Name
        Value: !Sub ${EnvironmentName} Private Routes (AZ1)

DefaultPrivateRoute1:
  Type: AWS::EC2::Route
  Properties:
    RouteTableId: !Ref PrivateRouteTable1
    DestinationCidrBlock: 0.0.0.0/0
    NatGatewayId: !Ref NatGateway1

PrivateSubnet1RouteTableAssociation:
  Type: AWS::EC2::SubnetRouteTableAssociation
  Properties:
    RouteTableId: !Ref PrivateRouteTable1
    SubnetId: !Ref PrivateSubnet1

NoIngressSecurityGroup:
  Type: AWS::EC2::SecurityGroup
  Properties:
    GroupName: "no-ingress-sg"
    GroupDescription: "Security group with no ingress rule"
    VpcId: !Ref VPC

Outputs:
VPC:
  Description: A reference to the created VPC
  Value: !Ref VPC

PublicSubnet1:
  Description: A reference to the public subnet in the 1st Availability Zone
  Value: !Ref PublicSubnet1

PrivateSubnet1:
  Description: A reference to the private subnet in the 1st Availability Zone
  Value: !Ref PrivateSubnet1

NoIngressSecurityGroup:
  Description: Security group with no ingress rule
  Value: !Ref NoIngressSecurityGroup
Step 4. Auto Scaling Group
After making sure that the SMARTUNIFIER Manager is running as intended it’s recommended to create an Auto Scaling group using the EC2 instance. With Amazon EC2 Auto Scaling your instance becomes more fault tolerance. In order to create an Auto Scaling group follow the steps described in the AWS documentation - Creating a launch template from an existing instance.
Backups
Manager Repository and Database
Repository
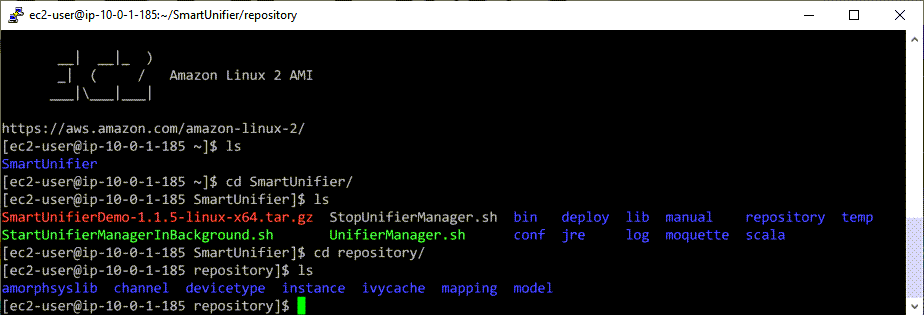
Every artifacts (Information Models, Communication Channels, Mappings, Device Types and Instances) created with SMARTUNIFIER are located in the repository directory.
We recommend to make regular backups of the repository. Follow the steps below in order to backup the repository:
SHH into the EC2 instance, which is running SMARTUNIFIER Manager.
Change into the SMARTUNIFIER Manager directory.
Copy the repository directory to a suitable location.

Database
Databases in SMARTUNIFIER are used to store Deployment Endpoints and User Accounts. Credentials of users are stored in separate Keystore file.
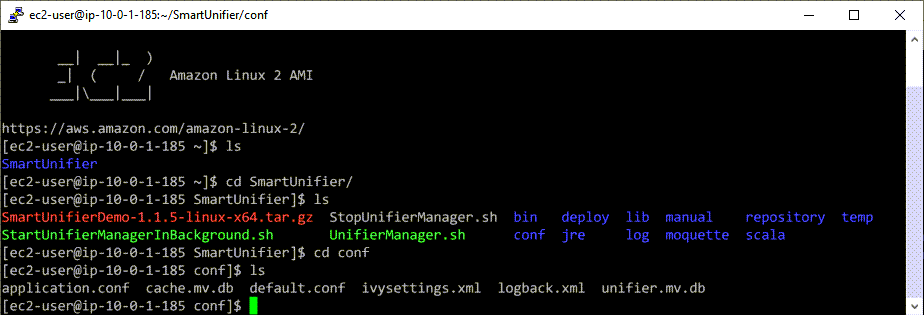
It’s recommended to make regular backups of the database unifier.mv.db. Follow the steps below to backup the database:
SHH into the EC2 instance, which is running SMARTUNIFIER Manager.
Change into the SMARTUNIFIER Manager directory.
Change into the conf directory.
You can now copy the unifier.mv.db database file to a suitable location.

EC2 Snapshots
We recommend to create a Snapshot of the EBS volume which is attached to the EC2 instance that runs SMARTUNIFIER . Follow the guide on how to create an Amazon EBS snapshot how to create an Amazon EBS snapshot.
If SMARTUNIFIER is not in use and you don’t want to be charged for EBS volumes, delete the EBS volume after creating a snapshot.
Recovery
It’s recommended to use Amazon CloudWatch with recover actions in order to recover instances in case of an instance failure.