Protocols
MQTT
Characteristics - MQTT
Information Model Requirements
The first Node after the root node
 must be of type Event
  .
.The following Node Types can be used under the Event Node:
Variables
 with a Simple Data Type represents the key-value pairs.
Variables
with a Custom Data Type represent objects that can contain key-value pairs.With Lists
 you can aggregate multiple variables.
In case of publishing a topic, the Information Model determines the structure of the payload.
In case of subscribing to a topic make sure that the Information Model structure matches the payload.
How to configure the MQTT Channel
Select the MQTT (JSON) as Channel Type.
Click the Configure button.

Select the root model node
Enter host and port of the MQTT Broker used.
Specify a path to a folder on your local machine. The temp directory inside the SMARTUNIFIER Manager can be also used.
Select Username and Password in order to enter username and password. If there are no credentials needed (e.g.,
test.mosquitto.org) make sure None is selected.

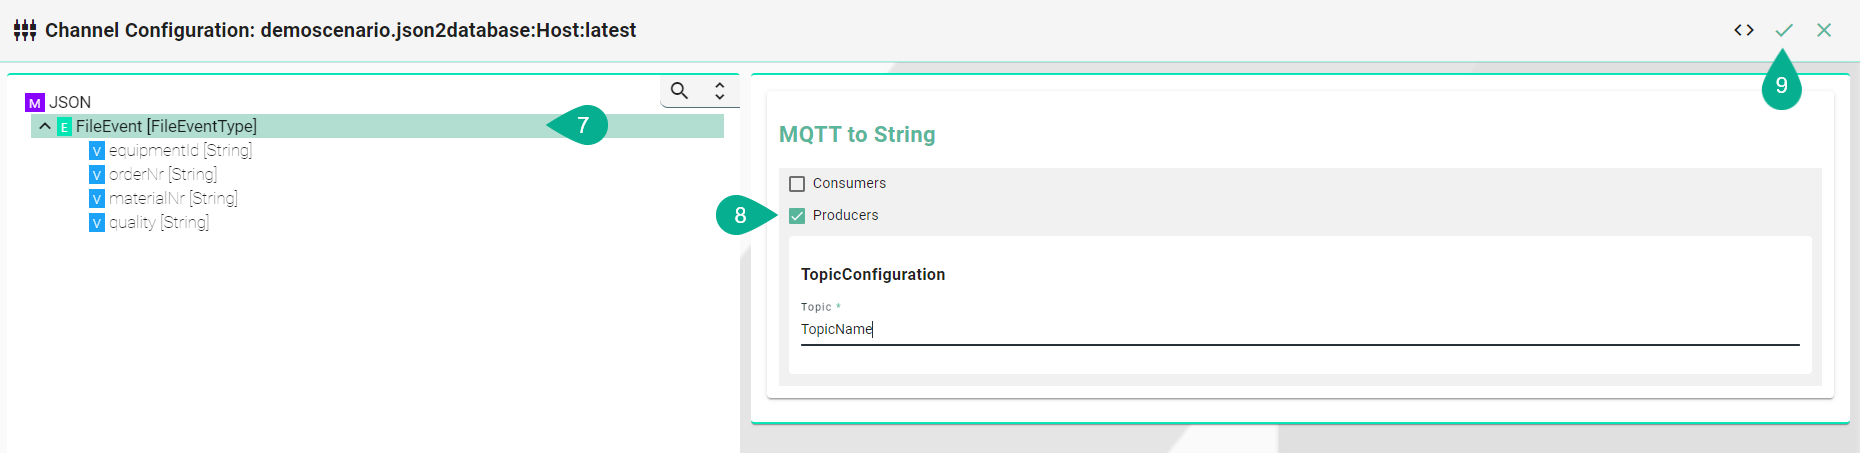
Select the event node in the tree on the left.
Enable either producer or consumer depending on the use case and enter a topic name.
Click the Apply button.
Certificates
Encrypted connection using TLS security is supported. Follow the steps below to encrypt the connection.
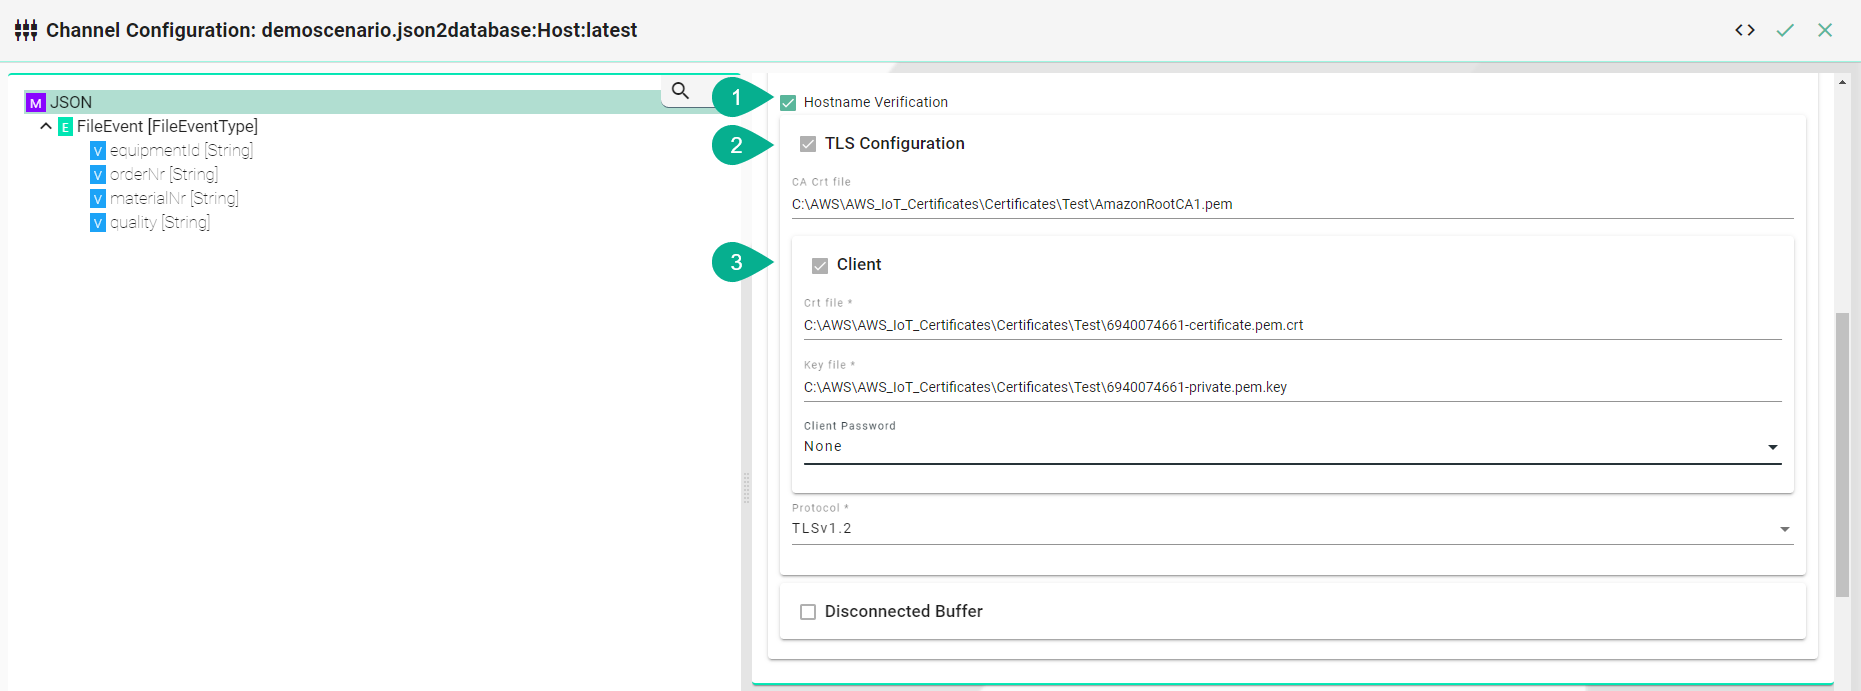
Enable Hostname Verification (optional)
Enable the Tls Configuration checkbox
Enter the path to the CA (certificate authority) certificate of the CA that has signed the server certificate
Note
Make sure the CA certificate is valid.
Enable the Client checkbox
Enter the path to the client certificate. The client certificate identifies the client just like the server certificate identifies the server.
Enter the path to the private client key.
If applicable select and enter a password.
Select the protocol from the Drop-Down.
Disconnected Buffer
In case the connection is lost, messages can be buffered offline when the Disconnected Buffer is enabled. Follow the steps below to enable the DisconnectedBuffer.
Enable the DisconnectedBuffer checkbox.
Set the Buffer Size - defines the amount of messages being hold e.g., 5000.
(Optional) Enable PersistBuffer.
(Optional) Enable DeleteOldestMessage.

Description of configuration properties:
Property |
Description |
Example |
|---|---|---|
host |
URL of the MQTT Broker. |
|
port |
Port of the MQTT Broker. |
|
reconnectInterval |
Time interval to reconnect to the MQTT Broker after loss of connection in seconds |
|
connectionTimeout |
Time interval the connection times out in seconds |
|
keepAliveInterval |
Time the session persists in seconds |
|
persistenceFolder |
Path to a folder for the persistence store of the MQTT |
|
clientId |
Identifies an MQTT client which connects to an MQTT Broker |
|
username |
Client username |
|
password |
Client password |
|
hostnameVerification |
Hostname Verification |
|
tls |
Encryption |
|
producers |
Data producer |
|
consumer |
Data consumer |
|
protocol |
TLS protocol version |
|
disconnectedBuffer |
Offline buffering of data |
|
bufferSize |
Amount of message allowed in the buffer |
|
persistBuffer |
Buffer persistence |
|
deleteOldestMessage |
Delete oldest message in buffer |
|
OPC-UA
Characteristics - OPC-UA
OPC (Open Platform Communications) enables access to machines, devices and other systems in a standardized way. To learn more about the standard visit the OPC-UA website.
Information Model Requirements
The following Node Types can be used to model data structures:
Variables
with a Simple Data Type.Variables
with a Custom Data Type.
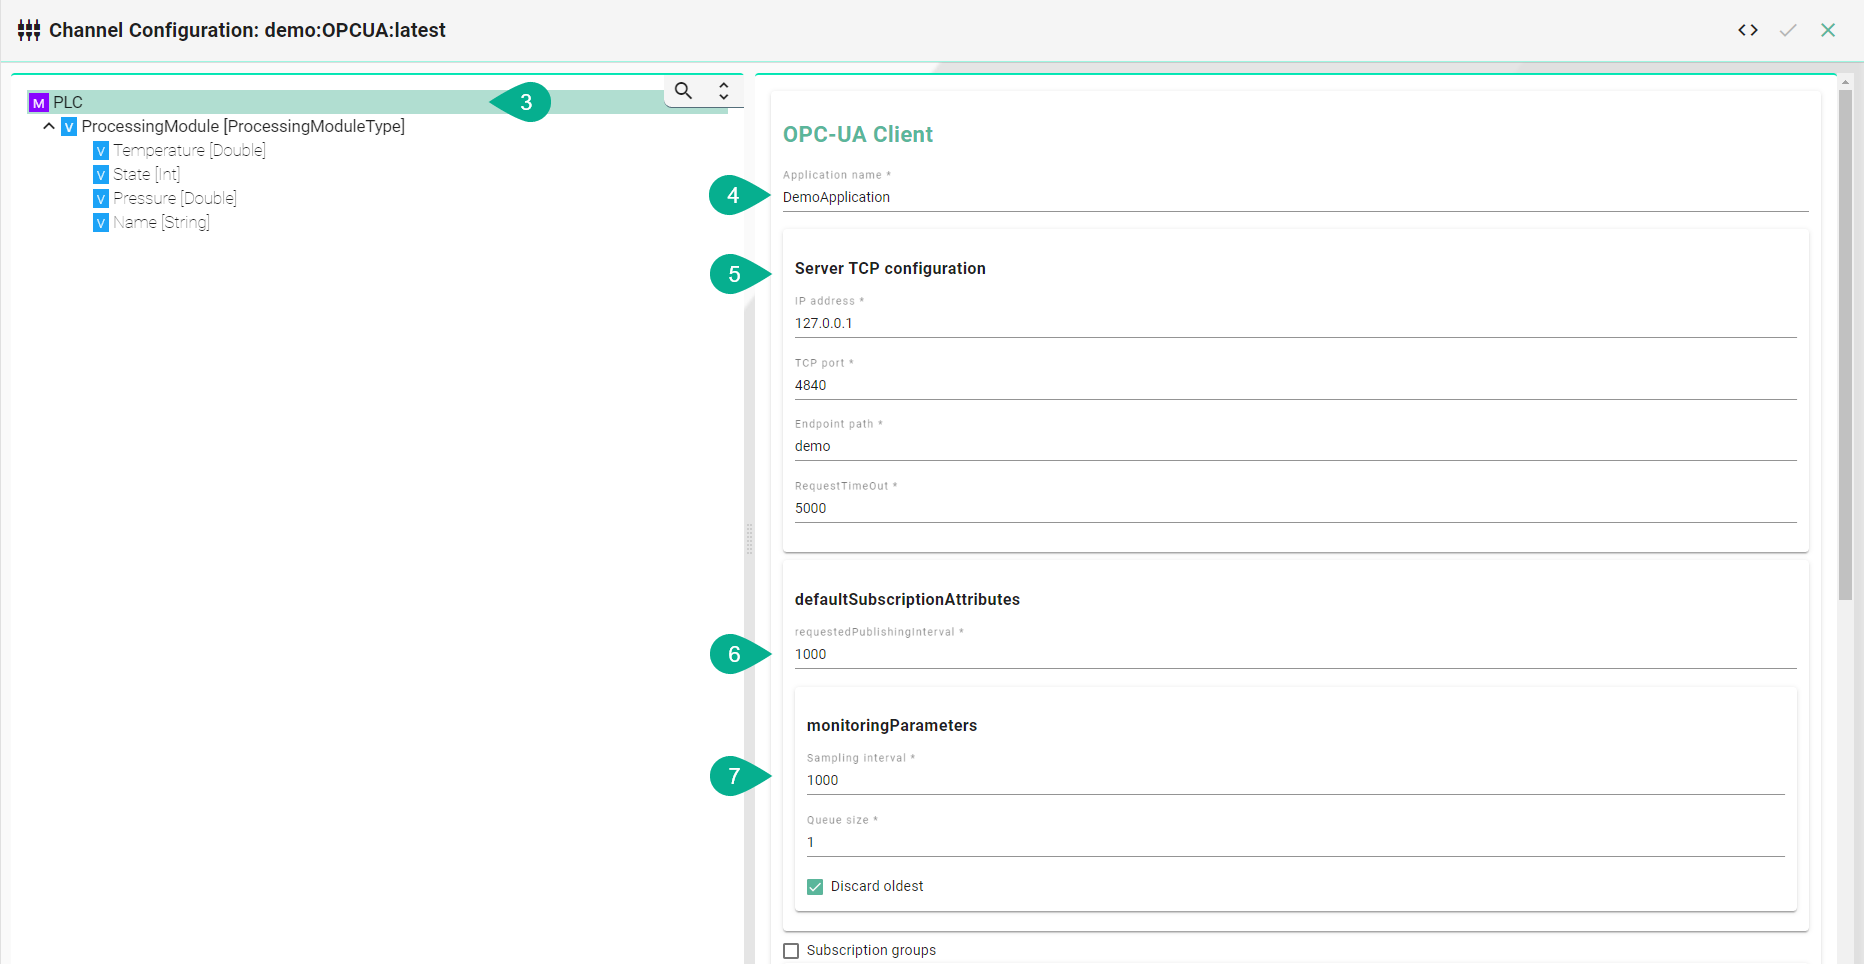
OPC-UA Client
Select OPC-UA Client as Channel Type.
Click the Configure button.
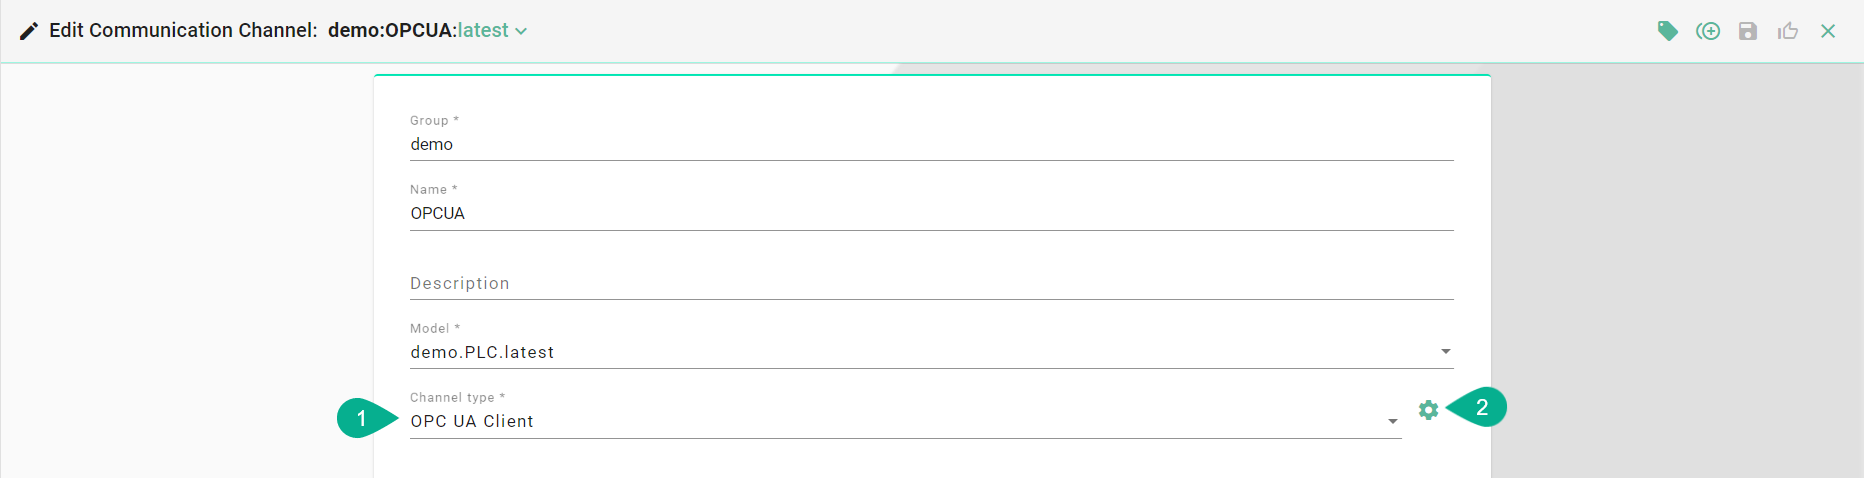
Make sure the root model node is selected to configure the OPC-UA Client
Enter an applicationName
Configure the serverTcpConfiguration
Enter an ipAdress
Enter the port
Define an endpoint
Set a requestTimeOut
Configure the defaultSubscriptionAttribute
Define a publishingInterval
Configure monitoringParameters
Set a samplingInterval
Enter a queueSize
Enable discardOldest depending on the use case
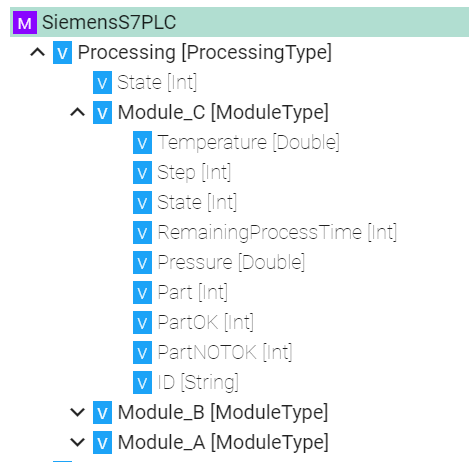
Select the complex variable node.
Enable the complexVariables

Assign OPC-UA data block variables to corresponding variables in the Information Model by selecting the variable in the tree
Assign data block
Enable the variables checkbox
Enter the nodeId

REST
REST Server
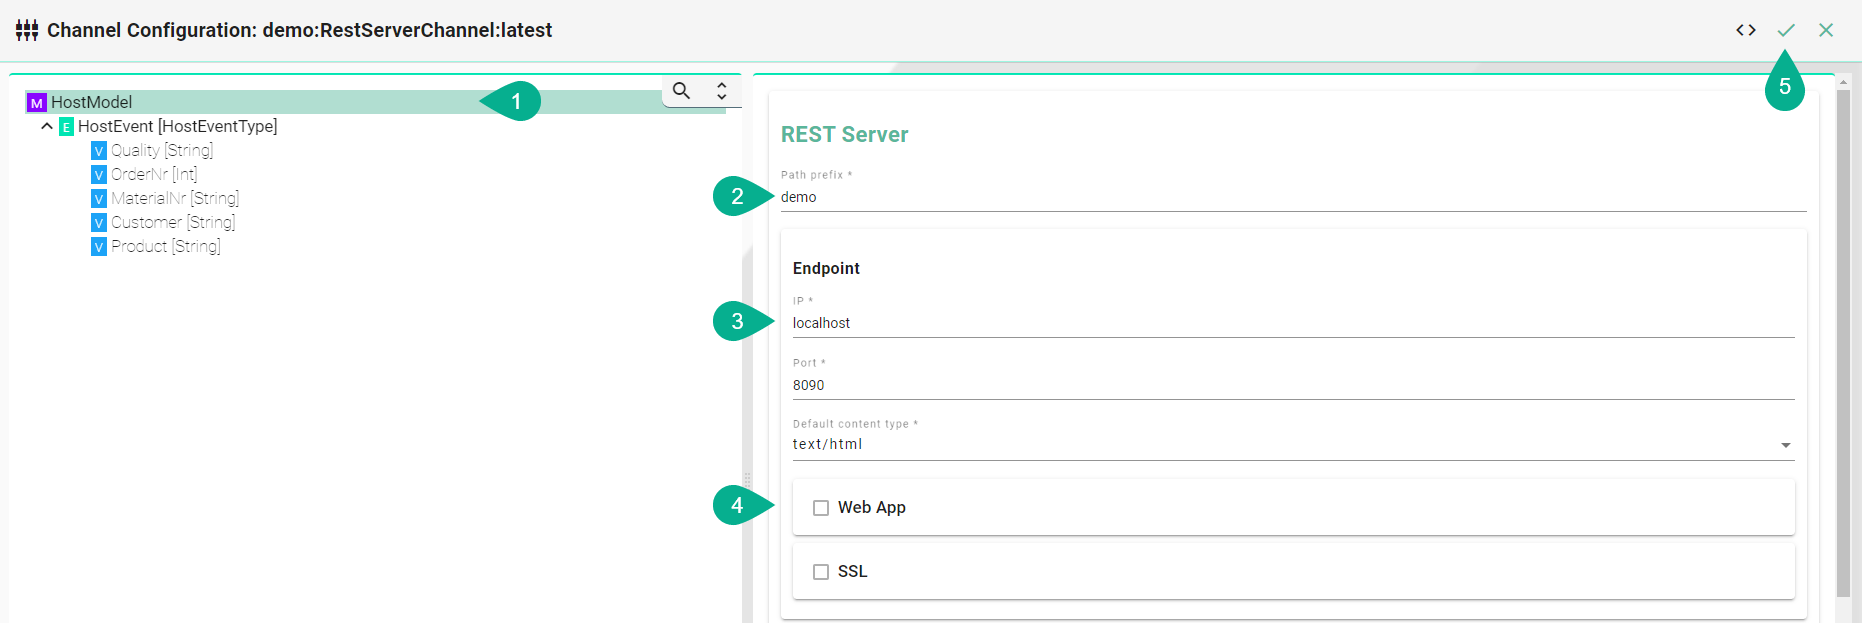
Select the root model node in the tree on the left.
Enter a path prefix.
Configure the REST Server endpoint.
Enter the IP.
Enter the port.
Enter the Content-Type.
Check the webapp checkbox and provide the WAR-file if you want to host an application.
Click the Apply button and save the Channel by clicking the Save button on the upper right corner.
Description of configuration properties:
Property |
Description |
Example |
|---|---|---|
pathPrefix |
Prefix for the URL |
|
Port |
Port of the REST server |
|
IP |
IP address of the REST server |
|
DefaultContentType |
Is used to indicate the media type of the resource |
|
webapp |
Possibility to host an application |
|
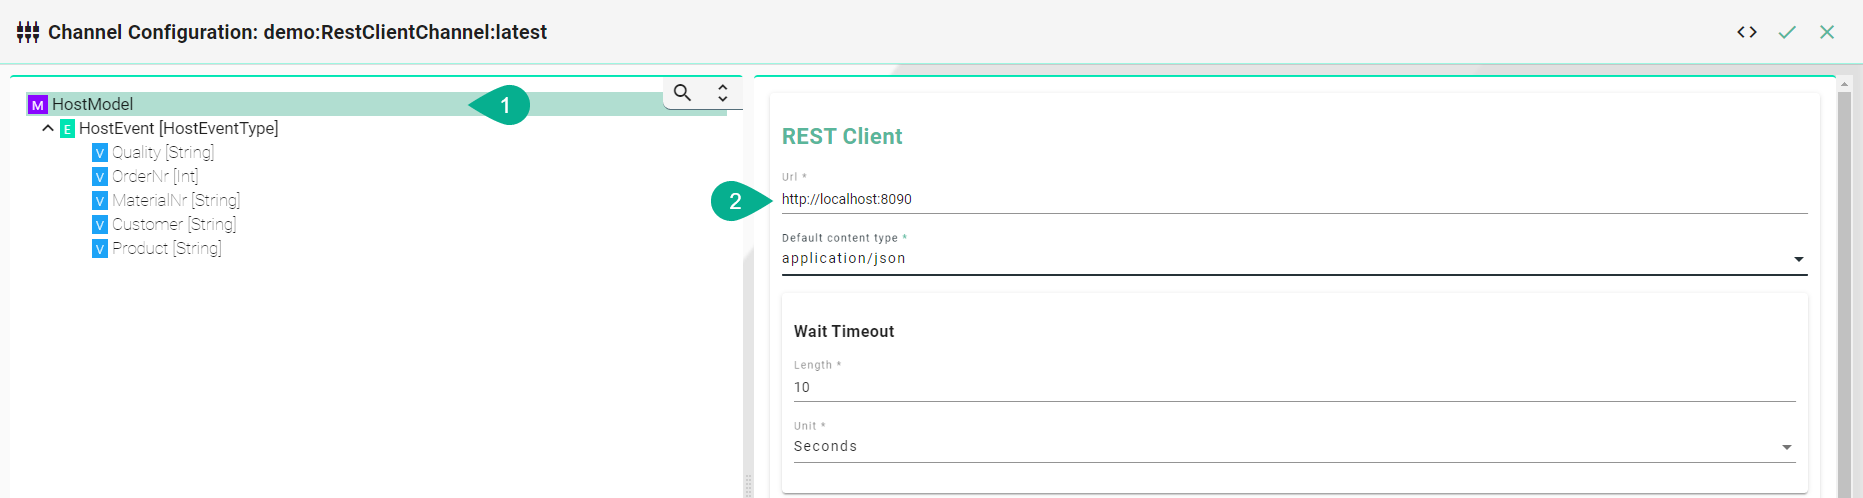
REST Client
Select the root model node in the tree on the left.
Configuration of the REST Client
Enter the IP.
Enter the Default-Content type.
Enter a timeout.
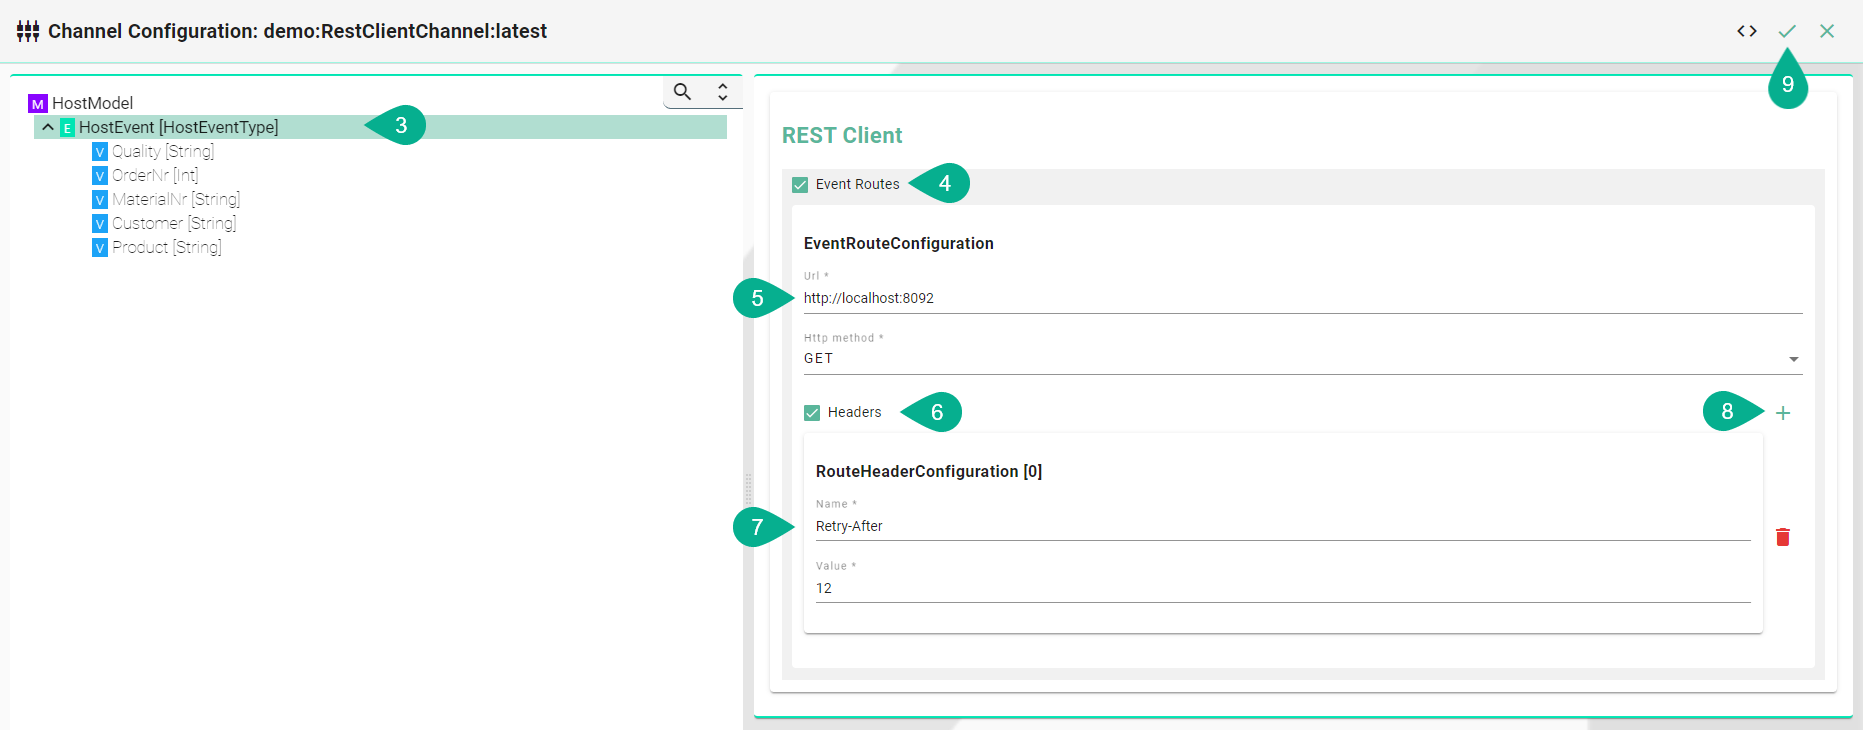
Click on the variable in the tree which needs a configuration.
Enable the Event routes checkbox.
Variable configuration.
Enter the URL.
Select the HTTP method.
Enable the Headers checkbox to add headers.
Configure Key-Value pair of the header.
Enter a name.
Enter a value.
Click on the Add header button to add more headers.
Click the Apply button and save the Channel by clicking the Save button on the upper right corner.
Description of configuration properties:
Property |
Description |
Example |
|---|---|---|
URL |
URL of the REST Server. |
|
RouteModelPath |
Path of a node in the Information Model. A node can be a command, an event or a variable |
|
RouteUrl |
URL of the exposed node. |
|
HttpMethod |
HTTP method for the action performed by the Client. |
|
HeaderName and Header Value |
To provide server and client with additional information |
|
ContentType |
Is used to indicate the media type of the resource. |
|
WaitTimeoutDuration |
Timeout in seconds until request is failing |
|