Protocols
MQTT
Characteristics - MQTT
Information Model Requirements
The first Node after the root node
 must be of type Event
  .
.The following Node Types can be used under the Event Node:
Variables
 with a Simple Data Type represents the key-value pairs.
Variables
 with a Custom Data Type represent objects that can contain key-value pairs.
With Lists
 you can aggregate multiple variables.
In case of publishing a topic, the Information Model determines the structure of the payload.
In case of subscribing to a topic make sure that the Information Model structure matches the payload.
How to configure the MQTT Channel
Select the MQTT (JSON) as Channel Type.
Click the Configure button.

Select the root model node
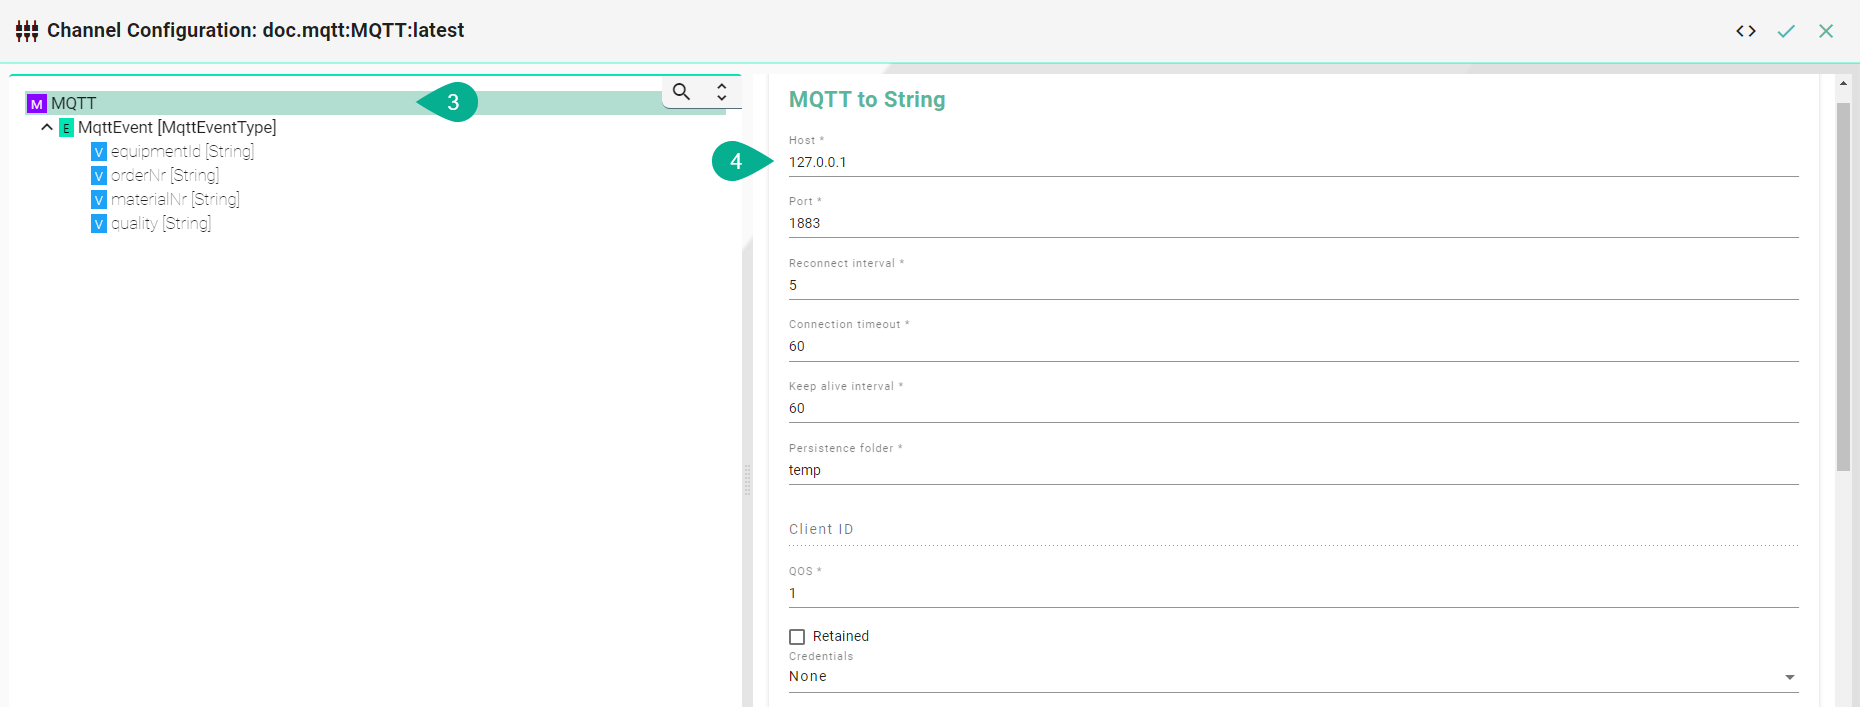
Configure the MQTT To String configuration:
Enter host and port of the MQTT Broker used
If required, adjust the default values for Reconnect interval, Connection timeout, Keep alive interval
Specify a path to a folder on your local machine. The temp directory inside the SMARTUNIFIER Manager can be used as well.
(Optional) Specify a Client ID
Set the Quality of Service (QoS)
(Optional) Enable Retained if required
Select Username and password in order to manually enter the credentials or select Username and password credentials reference to add it from the Credentials Manager. If there are no credentials needed (e.g.,
test.mosquitto.org) select None.
Select the event node in the tree on the left.
Enable either producer or consumer depending on the use case and enter a topic name.
Click the Apply button.

Json To Model Event Configuration
This configuration is used when some keywords or reserved words can’t be used in the Information Model.
Select the event node in the tree on the left.
Check the box for the Events configuration.
Input the Field name, representing the reserved word.
Click on the Apply button.

Json To Model Variable Configuration
Select a variable in the tree on the left.
Check the box for the Variable configuration.
Input the Field name, representing the reserved word.
Click on the Apply button.

Certificates
Encrypted connection using TLS security is supported. Follow the steps below to encrypt the connection.
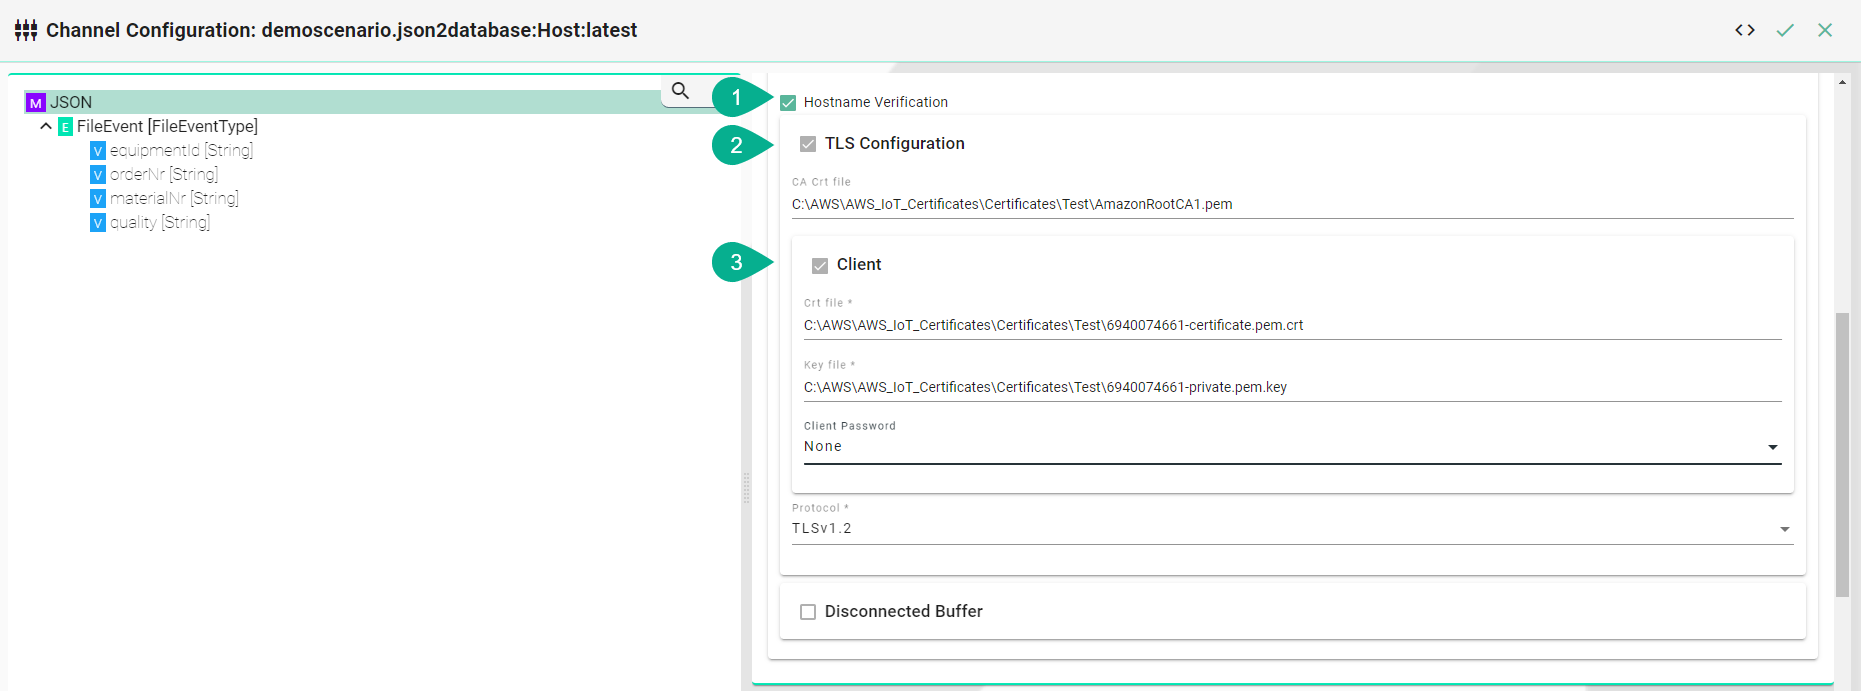
Enable Hostname Verification (optional)
Enable the Tls Configuration checkbox
Enter the path to the CA (certificate authority) certificate of the CA that has signed the server certificate
Note
Make sure the CA certificate is valid.
Enable the Client checkbox
Enter the path to the client certificate. The client certificate identifies the client just like the server certificate identifies the server.
Enter the path to the private client key.
If applicable select to enter a password or to add from the Credentials Manager.
Select the protocol from the Drop-Down.
Disconnected Buffer
In case the connection is lost, messages can be buffered offline when the Disconnected Buffer is enabled. Follow the steps below to enable the DisconnectedBuffer.
Enable the DisconnectedBuffer checkbox.
Set the Buffer Size - defines the number of messages being hold e.g., 5000.
(Optional) Enable PersistBuffer.
(Optional) Enable DeleteOldestMessage.

Description of configuration properties:
Property |
Description |
Example |
|---|---|---|
host |
URL of the MQTT Broker. |
|
port |
Port of the MQTT Broker. |
|
reconnectInterval |
Time interval to reconnect to the MQTT Broker after loss of connection in seconds |
|
connectionTimeout |
Time interval the connection times out in seconds |
|
keepAliveInterval |
Time the session persists in seconds |
|
persistenceFolder |
Path to a folder for the persistence store of the MQTT |
|
clientId |
Identifies an MQTT client which connects to an MQTT Broker |
|
username |
Client username |
|
password |
Client password |
|
hostnameVerification |
Hostname Verification |
|
tls |
Encryption |
|
producers |
Data producer |
|
consumer |
Data consumer |
|
protocol |
TLS protocol version |
|
disconnectedBuffer |
Offline buffering of data |
|
bufferSize |
Amount of message allowed in the buffer |
|
persistBuffer |
Buffer persistence |
|
deleteOldestMessage |
Delete oldest message in buffer |
|
OPC-UA
Characteristics - OPC-UA
OPC (Open Platform Communications) enables access to machines, devices and other systems in a standardized way. To learn more about the standard visit the OPC-UA website.
Information Model Requirements
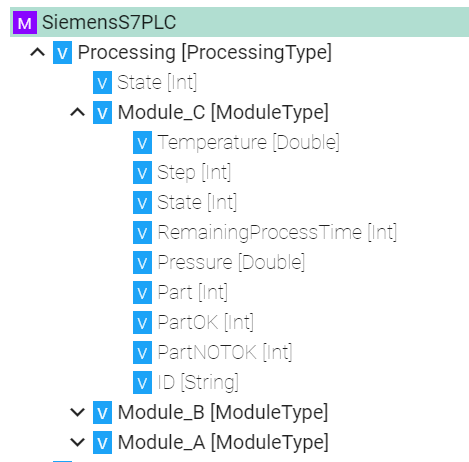
The following Node Types can be used to model data structures:
Variables
 with a Simple Data Type.
Variables
 with a Custom Data Type.
OPC-UA Client
Select OPC-UA Client as Channel Type.
Click the Configure button.

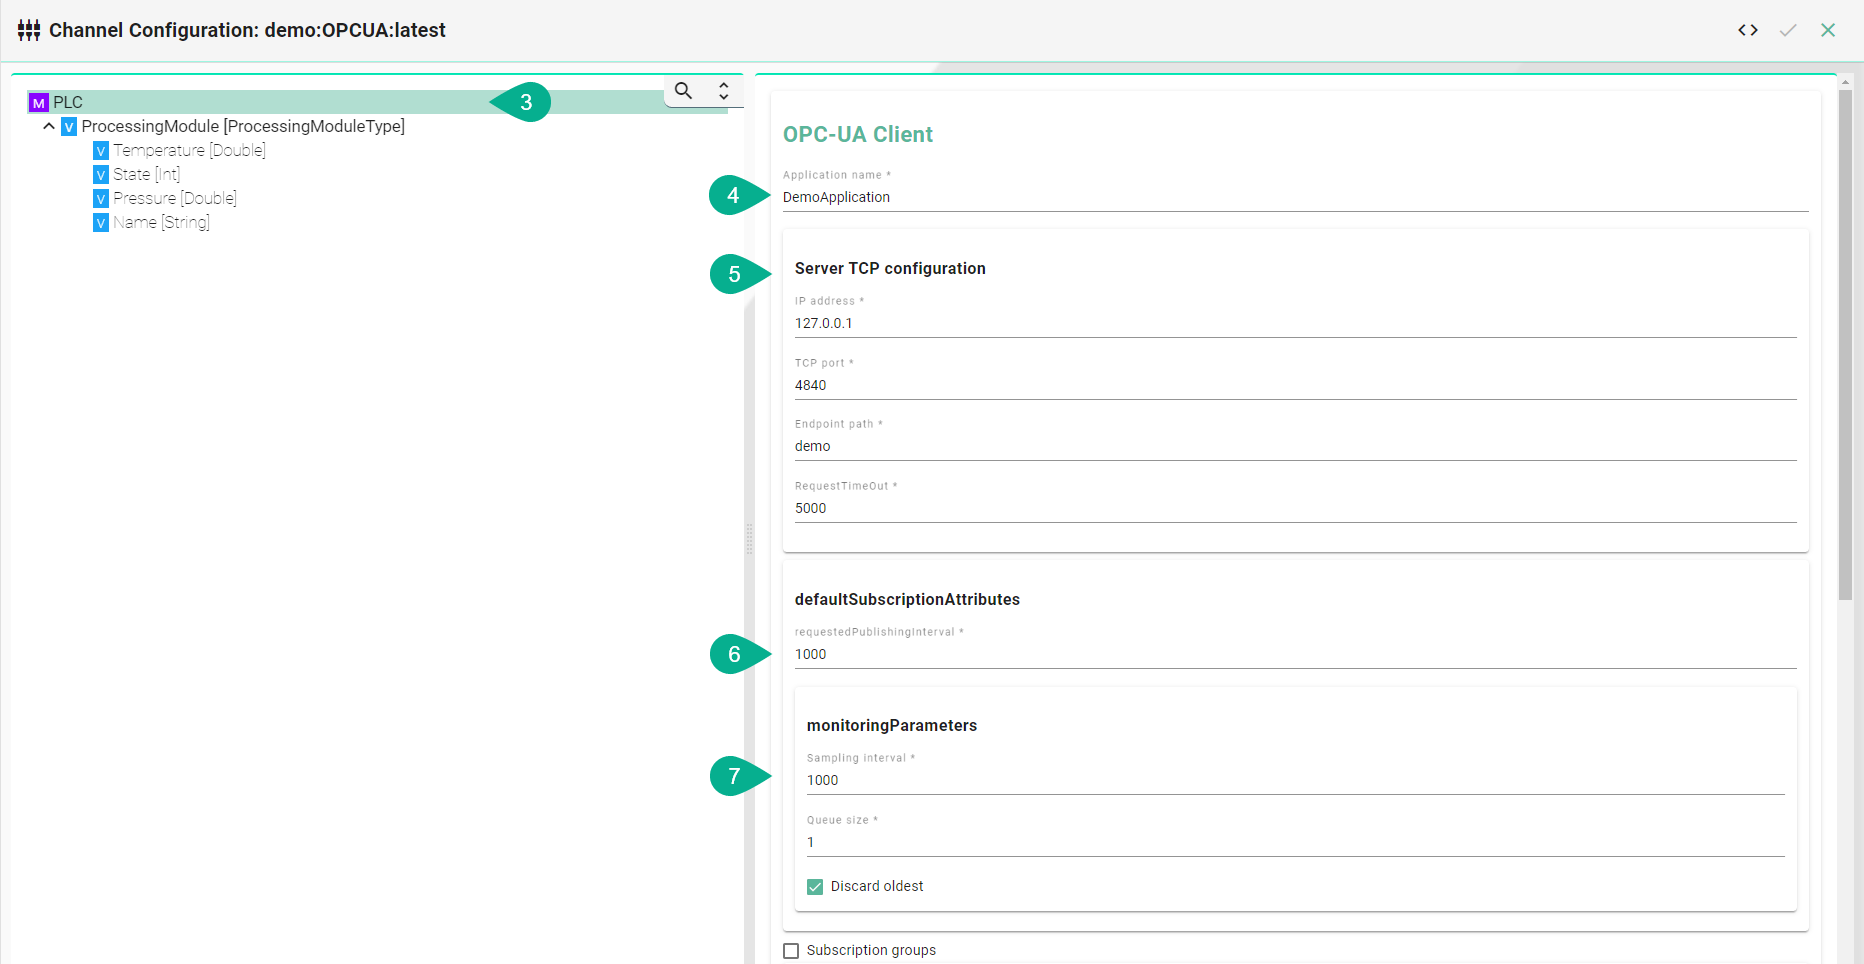
Make sure the root model node is selected to configure the OPC-UA Client
Enter an applicationName
Configure the serverTcpConfiguration
Enter an ipAdress
Enter the port
Define an endpoint
Set a requestTimeOut
Configure the defaultSubscriptionAttribute
Define a publishingInterval
Configure monitoringParameters
Set a samplingInterval
Enter a queueSize
Enable discardOldest depending on the use case
Select the complex variable node.
Enable the complexVariables

Assign OPC-UA data block variables to corresponding variables in the Information Model by selecting the variable in the tree
Assign data block
Enable the variables checkbox
Enter the nodeId

REST
REST Server
The following sample configuration shows how variables can be made accessible over a REST server.
Select the root model node in the tree on the left.
Enter a path prefix.
Configure the REST Server endpoint.
Enter the IP.
Enter the port.
Enter the Content-Type.
Check the webapp checkbox and provide the WAR-file if you want to host an application.
Click the Apply button and save the Channel by clicking the Save button on the upper right corner.

Description of configuration properties:
Property |
Description |
Example |
|---|---|---|
pathPrefix |
Prefix for the URL |
|
Port |
Port of the REST server |
|
IP |
IP address of the REST server |
|
DefaultContentType |
Is used to indicate the media type of the resource |
|
webapp |
Possibility to host an application |
|
REST Client
The following sample configuration shows a GET request using url parameters.
Select the root model node in the tree on the left
Select the content type - defines the media type of the associated representation
Set the wait timeout

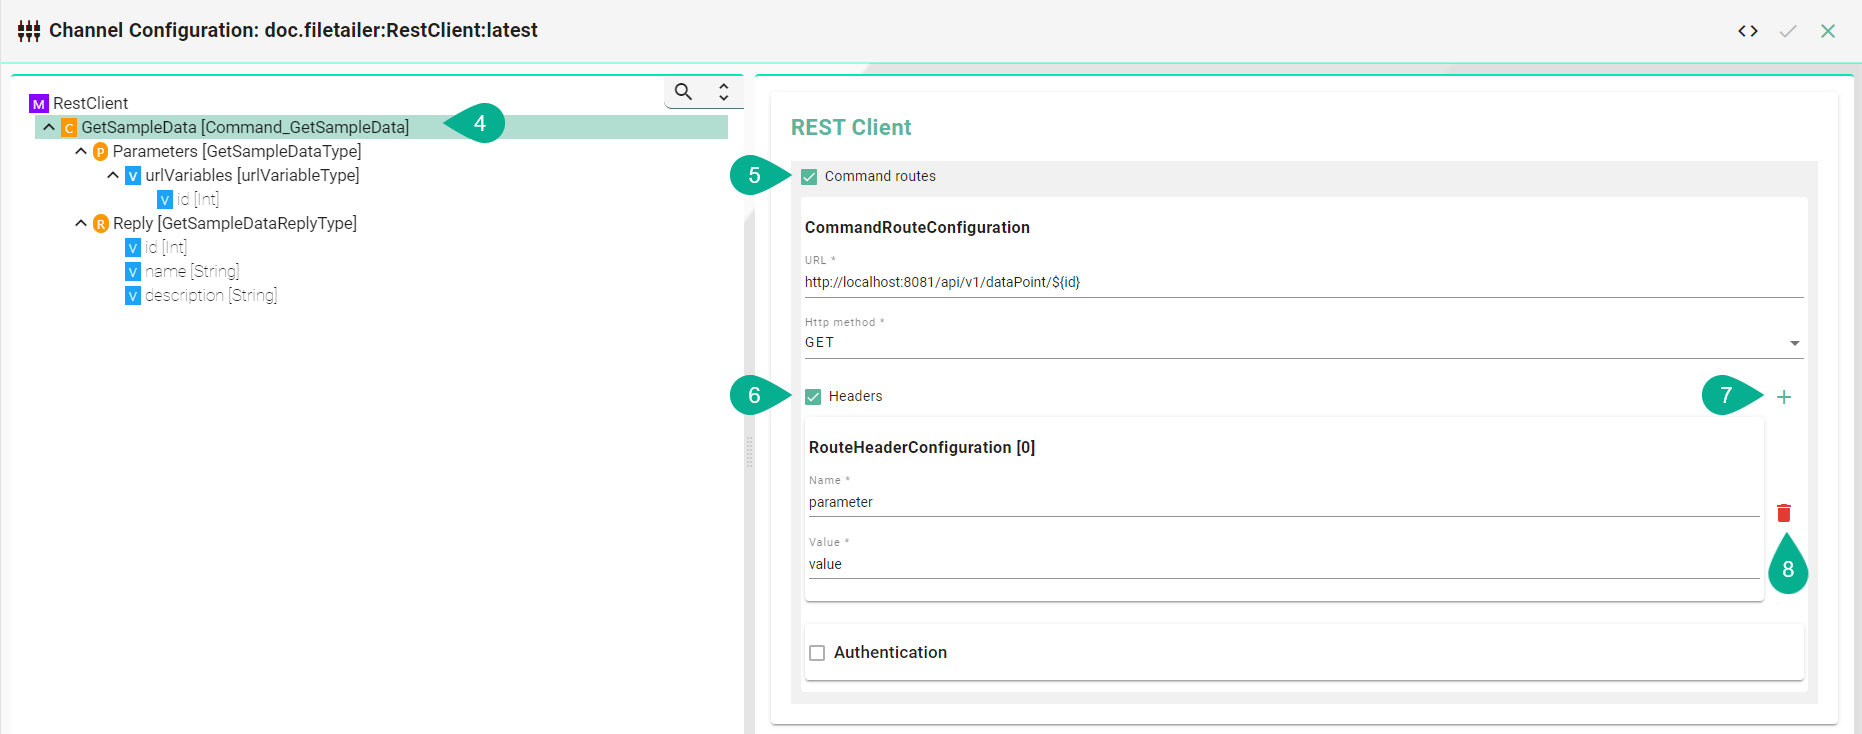
Select the Command node
Enable the Command routes checkbox for the configuration of the following fields:
Enter the URL - If URL parameters are used then add each parameter in the following syntax
${id}Select the HTTP method.
(Optional - Headers) Enable the checkbox Headers for the configuration of the following fields:
Enter the name of the header
Enter the value
(Optional - Headers) You can add multiple header entries by clicking the Add button
(Optional - Headers) Headers can be deleted by clicking the delete button
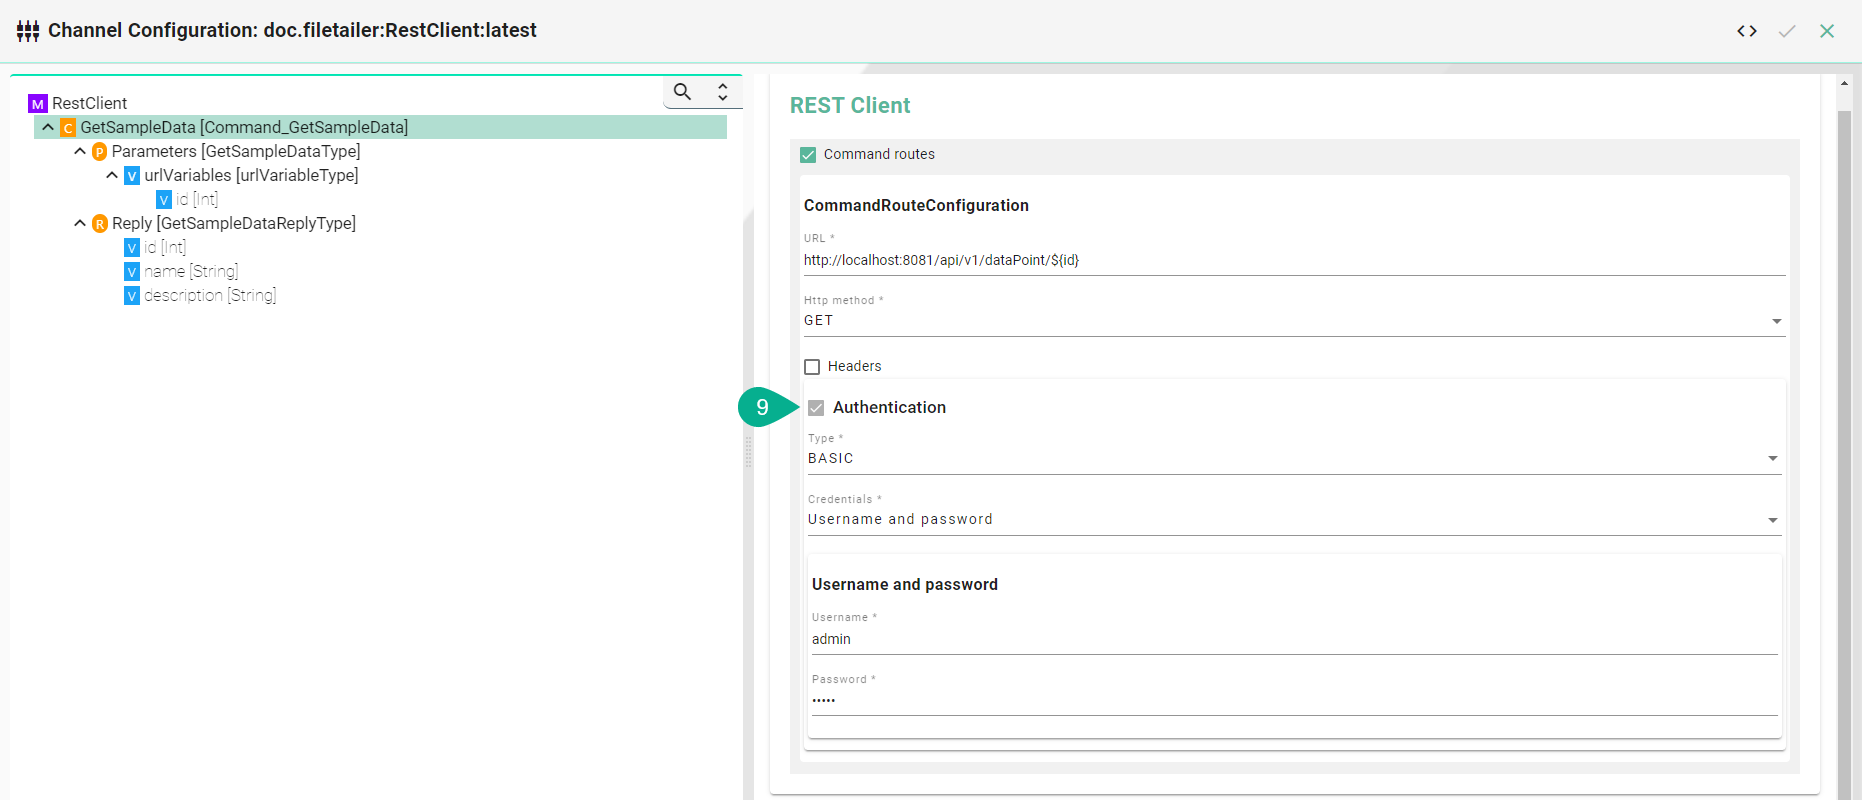
(Optional - Authentication) Enable the checkbox Authentication for the configuration of the following fields:
Select the Type of the Authentication
Enter the Username and Password or select it from the Credentials Manager
(Optional - URL Parameters) Select a custom variable and enable the command routes checkbox
(Optional - URL Parameters) Enable the command routes for the configuration of the following fields:
Select the Content Type
(Optional) Enter a Field Name in case the Information Model Node is not matching the REST API

Description of configuration properties:
Property |
Description |
Example |
|---|---|---|
URL |
URL of the REST API. |
|
HttpMethod |
HTTP method for the action performed by the Client. |
|
HeaderName and Header Value |
To provide server and client with additional information |
|
Default Content Type |
Is used to indicate the media type of the resource. |
|
RouteHeaderConfiguration |
Headers represent the meta-data associated with the API request |
|
Authentication Type |
Type of the Authentication |
|
Content Type of Parameter Nodes |
Type of the Parameter |
|
Field Name |
For non-matching Information Model nodes and API spelling |
|
WaitTimeoutDuration |
Timeout in seconds until request is failing |
|
SECS/GEM
Characteristics - SECS/GEM
The SECS/GEM is the semiconductor’s equipment interface protocol for equipment-to-host data communications. In an automated fab, the interface can start and stop equipment processing, collect measurement data, change variables and select recipes for products. To learn more about the standard visit the SECS/GEM section in Wikipedia website.
Information Model Requirements
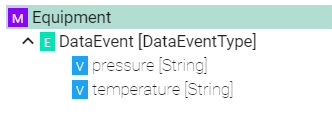
The first Node after the root node
 can be of type Event
  , Command
  or Variable
The following Node Types can be used under the Event Node:
Variables
 with a Simple Data Type represents the key-value pairs.
Variables
 with a Custom Data Type represent objects that can contain key-value pairs.
SECS/GEM Client
Select Secs Gem Client as Channel Type.
Click the Configure button.

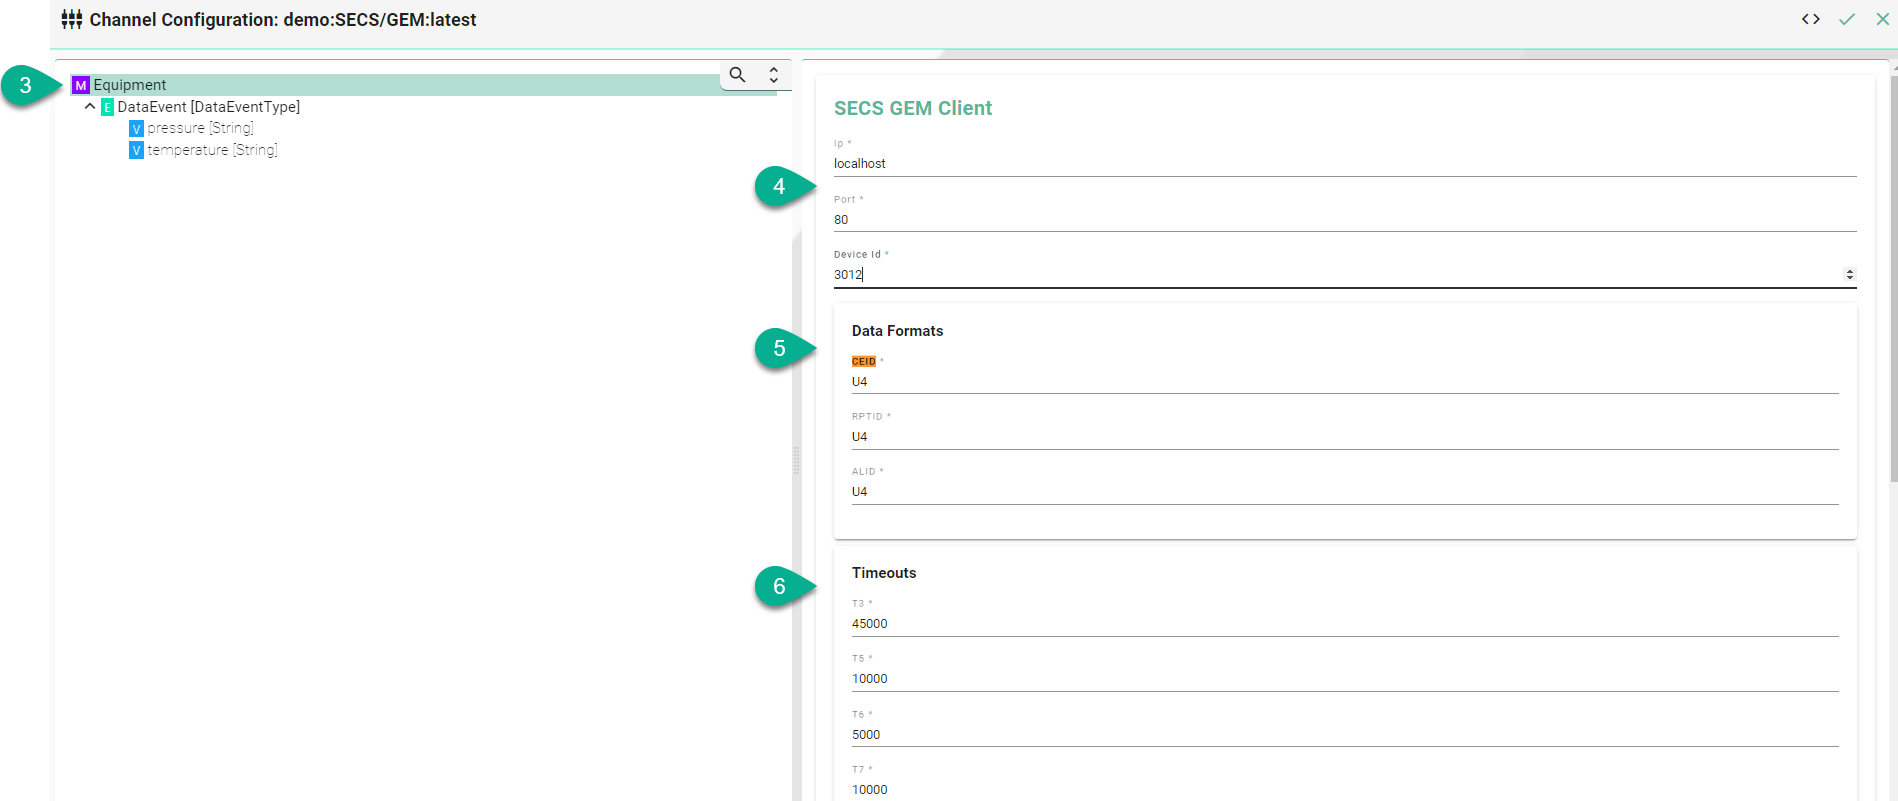
Make sure the root model node is selected to configure the SECS/GEM Client
Enter the device configuration:
input the equipment-to-host Ip address
type in the TCP Port for the communication
input the Device Id
Enter the Data Formats
Input CEID - format for event Ids
Enter RPTID - format for report Ids
Input ALID - format for alarm Ids
Input timeout for:
T3 - Reply Timeout in the HSMS protocol.
T5 - Connect Separation Timeout in the HSMS protocol used to prevent excessive TCP/IP connect activity by providing a minimum time between the breaking, by an entity, of a TCP/IP connection or a failed attempt to establish one, and the attempt, by that same entity, to initiate a new TCP/IP connection.
T6 - Control Timeout in the HSMS protocol which defines the maximum time an HSMS control transaction can remain open before a communications failure is considered to have occurred. A transaction is considered open from the time the initiator sends the required request message until the response message is received.
T7 - Connection Idle Timeout in the HSMS protocol which defines the maximum amount of time which may transpire between the formation of a TCP/IP connection and the use of that connection for HSMS communications before a communications failure is considered to have occurred.
T8 - Network Intercharacter Timeout in the HSMS protocol which defines the maximum amount of time which may transpire between the receipt of any two successive bytes of a complete HSMS message before a communications failure is considered to have occurred.
Select the logging type for the required Node Types:
Check the Enable box
Check the Log Data box
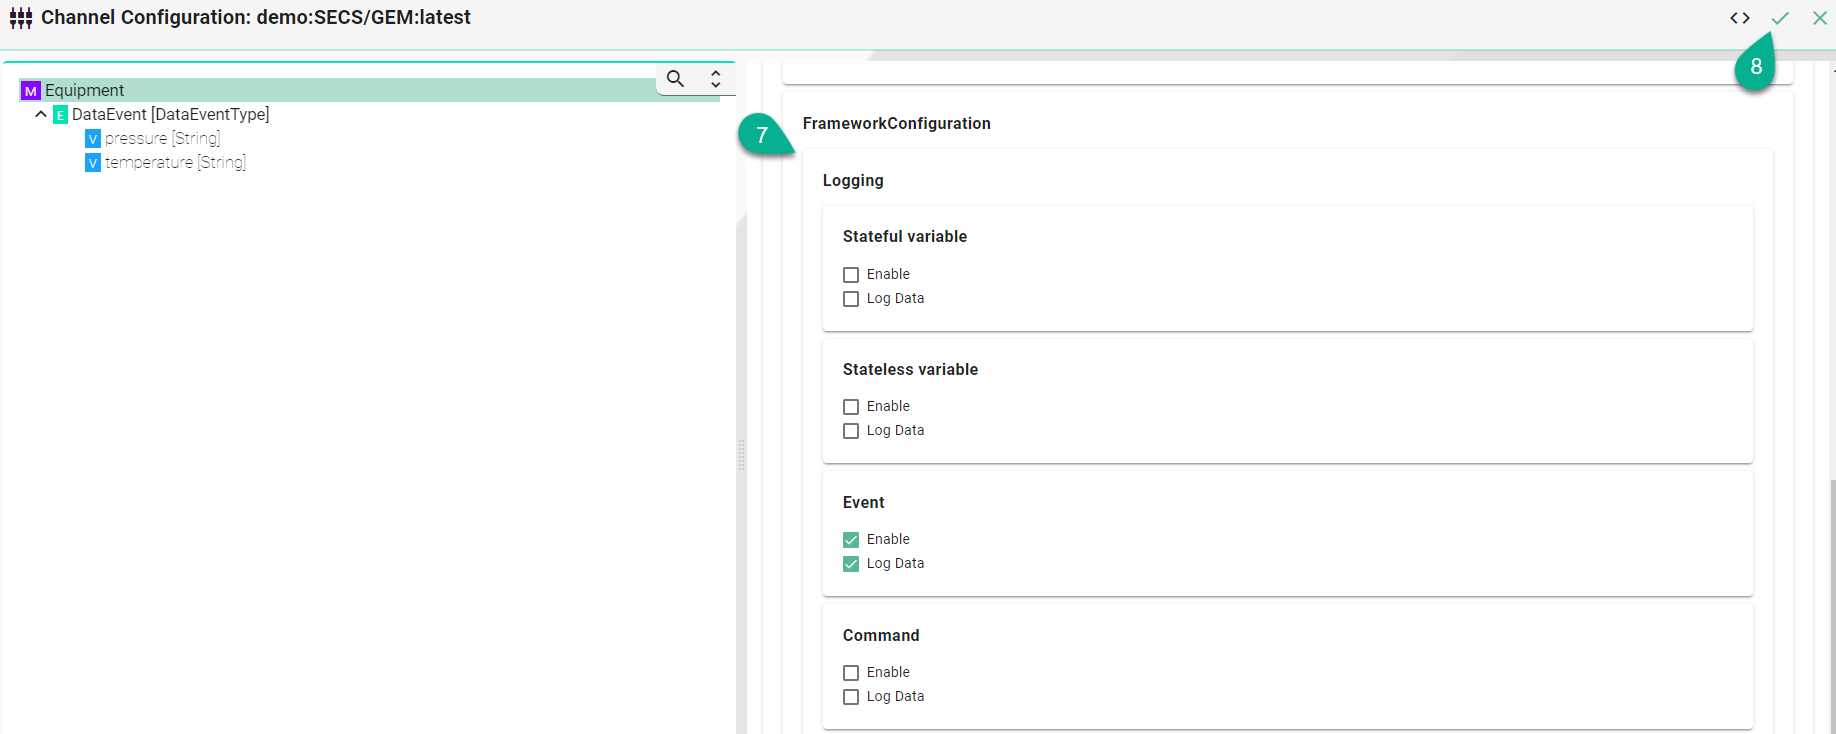
Click on the Apply button
Select the Event node to configure the event context

Click to check the Events box
Enter the event context Id which will trigger the event in the Information Model
Click on the Apply button
Select the variable in the tree

Click to check the variables box and configure the Secs variable context
select the variable Type
enter the variable Id
click the Is SV box to check if the variable is a SV
input the variable Name
Description of configuration properties:
Property |
Description |
Example |
|---|---|---|
Ip |
IP address of the Equipment |
|
Port |
TCP port for the communication |
|
Device Id |
Id of the equipment |
|
CEID |
Format for event Ids |
|
RPTID |
Format for report Ids |
|
ALID |
Format for alarm Ids |
|
Timeouts |
Time interval the connection times out in milliseconds |
|
T3 |
Reply timeout in the HSMS protocol |
|
T5 |
Connect Separation Timeout in the HSMS protocol |
|
T6 |
Control Timeout in the HSMS protocol |
|
T7 |
Connection Idle Timeout in the HSMS protocol |
|
T8 |
Network Intercharacter Timeout in the HSMS protocol |
|
Id |
Id of the equipment event which will trigger the event |
|
Type |
Type of variable |
|
Id |
Variable Id |
|
Type |
Commands - Type of the message |
|
Id |
Commands Id |
|
RCMD |
Name of command if it is different from the command Id |
|
AWS SiteWise IoT
Characteristics - AWS IoT SiteWise
The AWS IoT SiteWise Channel enables you to send data directly to assets measurements via the AWS IoT SiteWise API.
Information Model Requirements
The first Node after the root node
 can be of type Event
  or Variable
  .
.The following Node Types can be used under the Event Node or Variable Node:
Variables
 with a Simple Data Type represent measurements.
Variables
 with a Custom Data Type represent asset models.
The following measurement data types can be used when creating a variable of a Simple Data Type:
String
Int
Double
Boolean

Note
Make sure that the Information Model is available in the AWS IoT SiteWise service. You can use the AWS SiteWise extension in order to export an SMARTUNIFIER Information Model to AWS IoT SiteWise.
The following sample configuration shows how a AWS IoT SiteWise Channel is created.
Select AWS Sitewise as Channel Type.
Click the Configure button.

Enter the SiteWise configuration:
Enter the group of the Information Model
Enter the name of the Information Model
Enter the profile from the credential file that should be used
Enter the region of the AWS Iot SiteWise service you are using
